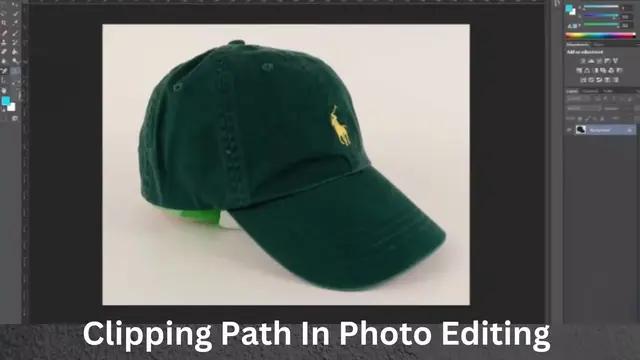
A common question of newbie designers is – what is Clipping Path in Photoshop? It is a precise outline or vector path. You can draw it around a specific part of an image layer.
When you apply a clipping path, only the pixels within the path will be visible. So, designers use the technique to isolate graphical objects from their backgrounds or make them transparent. Along with separating things, the clipping path also confirms the smooth edges of detached objects. The technique has a major role in professional photo editing.
Explore the use of the clipping path, how to apply it, professional tips for a better clipping path, and more in the below sections.
Types Of Clipping Paths in Photoshop
Though clipping path sounds like a single technique, it has varieties. Check the overview of each type.
Basic clipping path
This one is the most simple type of clipping path method. It is usually applied on objects with simple and smooth edges. You can use the basic technique to remove the background of products with simple circular or square shapes. It is the quickest option among all clipping path methods.
Medium clipping path
The outlining method is commonly used when a moderate clipping path is needed. For example, you can apply a medium clipping path to objects with relatively complex edges, like jewelry, furniture, etc. Compared to the basic clipping path, it needs more precision. Sometimes, it may require multiple paths to capture the details of objects.
Complex clipping path
Objects with complicated details and edges require complex clipping paths. This method effectively identifies and separates objects with hair, fur, or transparency. A complex clipping path ensures accurate outlining without destroying the natural surface of an entity in the photo. It is a time-consuming process, but it provides a super impressive result.
Super complex clipping path
This type of clipping path is highly demanded in many business industries. It is applied when the object has a highly complex shape. For example, a tree, bicycle, or fence with super complicated patterns requires such a clipping technique for isolating objects. Without a high level of expertise, it is challenging to achieve satisfactory outcomes.
Multiple clipping path
Multiple clipping paths require drawing several paths in a different section of an object. The technique is commonly applied to clothing items due to their complex shapes. Such clipping strategies provide more accuracy and flexibility in editing. It gives the editor precise control over each section to isolate objects effectively.
Deep clipping path
This more advanced method creates a realistic sense of depth and dimension while clipping. Applying such a technique, you can create a variety of effects. That’s why it is widely used in professional photography and graphic design. A deep clipping path is applied to things with highly complex shapes. It involves utilizing multiple clipping paths layered on top of each other.
Applications Of Clipping Path In Photo Editing
Clipping path has application in nearly any visual content published in print media, web, marketing materials, social media, and others. Its demand is rising because the work needs expert hands for perfect application. Here are the primary sectors where it is applied.
E-commerce product photography
Product photos on ecommerce must be clean and professional. Here, the clipping path plays a crucial role. Its techniques make product images more polished and enhance the focus by making the background transparent.
Without messy surroundings, this background removal process represents a product more clearly in the photo. It helps customers understand the item better and make a buying decision. The outlining procedure also assists in highlighting fine details and features of products that add more value to branding.
Graphic design
This subject isolation process lets designers unleash limitless creativity. Clipping paths are not limited to background removal. Instead, it has numerous uses that empower graphic designers to craft impressive designs. The procedure has vast applications in custom shapes for logos, icons, and illustrations. Undoubtedly, it is a crucial strategy to achieve the finest result possible.
Photo editing
The clipping path is a powerful process for photo editors, offering more customization. They use it to create innovative effects in images and enrich visuals. In the photo shoot, achieving perfection in the background is challenging for various reasons. A clipping path is an effective solution for such issues. It isolates the target object and places it on your desired background.
Maintaining image quality
Along with background removal, the clipping path also assists in maintaining image quality. During photo editing, it preserves the original photo. This subject isolation technique confirms the edges and complex details of the item remain intact. Thus, you get high-quality product images and essential elements for graphic design for future use.
How To Create Clipping Path In Photoshop: Step-By-Step Guide
Here is a sequence of applying a clipping path on an image in Photoshop. Check it out and try accordingly.
Step 1: Launch Adobe Photoshop on your PC or Mac, and open the photo you want to work on. From the left side toolbar, select the “Pen” tool.
Step 2: Choose the object/portion you want to detach from the photo. Then, click and draw the initial path along the object’s outline. You can move the anchor points or create curves to modify the path. When needed, add or remove additional anchor points.
Step 3: After outlining the object, right-click on an anchor point and select “Close Path.” You can also close the path using Ctrl+J (Windows) or Cmd+J (Mac).
Step 4: Click on the layer containing the object you want to separate. Go to the “Layers” menu and select “Create Clipping Mask” to isolate the thing from its background.
The clipping path process is complete. Thus, detaching any object from a photo is possible.
Additional tips:
- You can refine the path by adding, removing, and adjusting anchor points. If the path looks uneven or jagged, use the Smooth tool (from the Tools panel) to smoothen it.
- For future use, you can save the clipping path. Go to the Paths panel and click the menu icon. Select “Save Path” and give the path a name.
Suggestions To Create An Effective Clipping Path In Photoshop
- Grow your control and accuracy in the clipping path by consistent practice with the Pen tool.
- Work with a high-resolution image. It will help you capture the details of the object. You can achieve a smooth and professional-looking outline.
- For items with complicated details, zoom in on the specific areas you want to place anchor points.
- After creating a clipping path for a particular object, save it for future use.
- Experiment with different methods of clipping paths. For example, use the Magic Wand Tool for simple shapes and the Extract Tool for complex things.
- Practice with a solid commitment to improve your outlining and isolation skills.
Advantages Of Applying Clipping Path On Images
For clean and professional image presentation, clipping path is a must-use method. It offers flexibility in editing while keeping the original quality of the image. Here are the advantages of applying clipping paths on photos.
Accuracy and precision
In graphic design, accuracy matters from many angles. Due to the use of anchor points, clipping paths can outline objects with high accuracy despite they have complicated details. Such precision is a crucial aspect of e-commerce product photos.
The technique separates the product from its background and defines the details sharply. Representation of fine detail this way maximizes customer engagement and boost sale. The editing method also lets you enhance features in an image and creates visual charm.
Non-destructive editing
It is a crucial image isolation accessory in photo editing, which is entirely non-destructive. Image editors can experiment with creative things through it without damaging the original photo. The technique provides precise control over object separation and background removal. With the separated portion, you can do extreme modification safely. In short, it adds an extra safety layer to authentic images and encourages versatile editing that produces maximum results.
Smooth edges and visual appeal
The clipping path smooths an object’s edges and creates standard visual appeal. It ensures clean borders of an object and enhances a professional look. When the anchor points are applied accurately, it prevents jagged edges and makes the thing more apparent.
That’s why clipping path has a high demand in the e-commerce industry, as it assures high-quality presentation of products. This outlining method is the secret technique to achieve the beautiful look of the product and professional display.
Clipping Path Vs Clipping Mask: The Differences
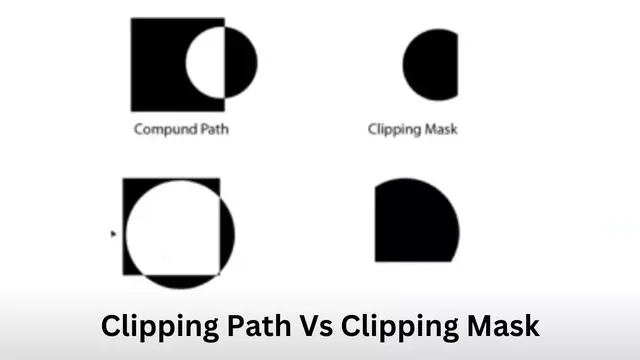
Though both technique sounds similar, they have several differences. The chart represents the differences between clipping path and clipping mask in photo editing.
| Points | Clipping path | Clipping mask |
| Fundamental | It is a method of outlining a specific area of an image using the path. | The technique restricts the visibility of one layer based on another. |
| Usage | Isolating objects from their backgrounds. | Revealing or hiding portions of a photo. |
| Process | Paths are drawn around the object. | Two layers (for the mask and masked )are required. |
| Key advantage | A non-destructive process of object isolation. | It allows adjustments in photos without altering the data. |
| Application | E-commerce photography, graphic design, etc. | Photo retouching, layered compositions, etc. |
Limitation Of Clipping Path In Photoshop
Despite being a powerful image editing strategy, clipping path in Photoshop still has the following restrictions.
Time-consuming process:
Clipping Path is very time-consuming work. It requires additional time if the object has a complex shape. Besides, you need to be very careful while placing the anchor points. If the result is unsatisfactory, refinement may need more time.
Limited to vector-based images
This background removal option is primarily available for vector-based images. Though you can apply a clipping path on a raster image, the edges may not appear smooth. Using the technique on a raster image can make an object’s edges jagged, a big drawback of the feature in Photoshop.
Requirement of high-level skill
Clipping path – is a challenging task for beginners. It requires pure attention and a skilled hand for the perfect application. Achieving such expertise may take a long while. On the other hand, hiring a clipping path professional can be expensive for individuals and small businesses.
Editing after application
If you apply a clipping path to a layer, editing it directly is impossible. It means you have no option of adjusting anchor points when used. The only way to re-edit them is to create or modify a new clipping part through an adjustment layer. In case of imperfection, it can consume extra time and effort.
Final Words
Understanding “What is Clipping Path in Photoshop” is crucial when someone is entering the kingdom of graphic design. It is a robust subject isolation process that maintains the maximum accuracy during clipping an object. With versatility and a non-destructive approach, it lets you produce clean and visually appealing professional images. So, mastering clipping paths should be a priority for any graphic designer.
Frequently Asked Questions
1. Is it possible to use multiple clipping paths in a single image?
Of course. Multiple clipping path is a common practice for different purposes.
2. Can I apply a clipping path to images with complex backgrounds?
You can do it. However, you may need versatile clipping techniques for such a process.
3. Is clipping path applicable for both raster and vector images?
Application to both types of images is possible. However, clipping paths work well with vector images.